How to Address the Root Cause of Swayback Posture: Exercises + Tests
Dec 09, 2021
Swayback posture is a representation of several layers of compensation built up over a period of time.
These people are often very limited in many different types of range of motion throughout the entire body, but just with any other posture, it is simply a method to manage our center of gravity.
In this article, I will discuss:
- How swayback posture develops
- What tests indicate common swayback posture compensations
- What to do about it + example exercises
If you would rather watch than read, see the video below:
How Swayback Posture Develops
As I mentioned above, swayback posture doesn't develop by accident. I want to preface this that there are certainly genetic influences to how posture develops over time, but we're going to talk about the basic mechanics and more along the lines of things we can control.
There are specific steps that occur and "layers" of compensation which we can identify via specific assessment results. I address this in my Biomechanics Program, but there are general characteristics that all people of Swayback Posture tend to have.
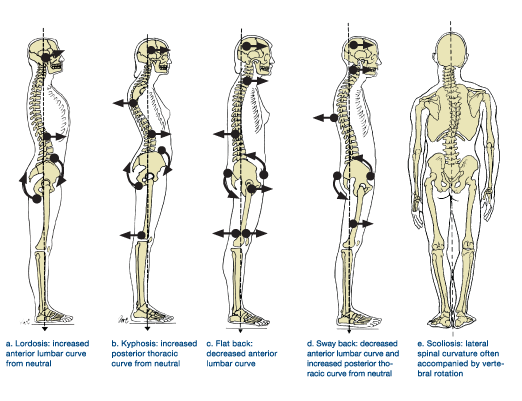
Take a look at the following image - what do these postures have in common?

You probably guessed it - they're all just different methods of self-organization of our spine curves, pelvic position, and limb positions so that we can keep a neutral center of mass so we don't fall excessively forward or backward.
Think about gravity and how we are unconscisouly dealing with it all deal, every day. And we have been since the beginning of time, literally! So as a specicies concerned with survival, wouldn't it make sense that we will self-organize our posture in the way that allows us to fight gravity the least (thus conserving as much energy as possible while standing)?
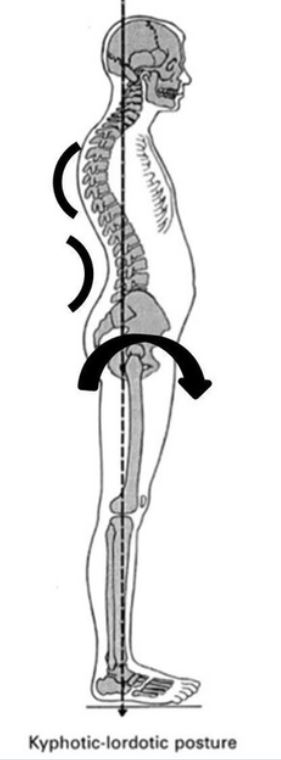
So now let's imagine what happens in terms of sequencing of compensations. Let's say we are originally biased towards a more "upright" posture, as when we are young (assuming no abnormailites present), we haven't had much time to compensate. Many people end up in a position of anterior pelvic tilt (more on that here). When this happens, often times the increased low back curvature (lordosis) will create a need to increase the upper back curvature (kyphosis) in order to keep that even center of mass.
But not everyone stops there.
If we are really far forward relative to our center of mass and we unconsciously sense our center of mass off-balanace, we have to "pull ourselves back" somehow, right? We can accomplish this by squeezing our lower glutes and pelvic musulature which will pull our pelvis underneath ourselves and round our low back:
This also pulls the sacrum (middle pelvic bone that attaches to our spine), back into a position of counternutation. Also, just so we're on the same page, I am exaggerating the pelvic/SI joint movement for illustrative purposes. In reality, it doesn't move that much, but it still does move to a lesser extent.
In combination with this, we often see the six-pack (rectus) abs, which attach on the lower ribcage and also the bottom of the pelvis, get tight and pull the trunk down and back. This is a primary factor in how those with swayback posture have that "rounded back" visual presentation:
:background_color(FFFFFF):format(jpeg)/images/library/12986/jt6lkyuTYizDZFWnsiHpng_Musculus_rectus_abdominis_01.png)
We then have a presentation that looks like this:
Common Movement Limitations of Swayback Posture
If you think you might have swayback posture, then there are a few common test results we will see that are very common in these types of postures:
1. Active Straight Leg Raise of 45 Degrees or Less
This is one of, if not the most common, results of the pelvic presentation. Remember how the lower glutes and pelvic muscles will "tighten" and squeeze the lower pelvis shut? In order to get beyond 45 degrees of a straight leg raise actively, we need to open up the pelvic outlet and nutate the sacrum. Those who have swayback posture will not be able to do this and therefore see compensations in this assessment before (or at) 45 degrees.
2. Limited Hip Internal Rotation
Because the glutes and muscles of the lower pelvis that are compressing the back pelvis are external rotators, they are going to push the femurs into a position of compensatory external rotation, which will ultimately limit internal rotation of the hips. I would expect to see less than, but sometimes a lot less than, around 20 degrees of internal rotation on either side.
3. Limited Shoulder Flexion
The trunk is in a position of excessive flexion, which compromises the relationship between the scapula and the ribcage (more on that here). Shoulder flexion is a measurement of the ability for the scapula to glide effectively on the ribcage, so it will often be limited to around 90 degrees before we see a compensation in the test.
Exercises for Swayback Posture
So what do we do about it? In this case, it is going to be a bit different than how I would normally address movement limitations.
Most people have a problem with excessive extension, but in this case, it is an additional compensation on top of that.
We also need to work in positions with initially lots of references. This means that our body is in contact with lots of external objects like the floor, wall, or a table. This will provide stability and a sense of safety for the body to achieve the positions we want, as these types of individuals often times can't manage gravity very effectively without defaulting back to their compensatory strategies.
Those with swayback need to first do the following things:
Decompress their back glutes and lower pelvis while regaining extension and internal rotation
We can accomplish this by opening up the space in the back hips, but we wouldn't want to do it as I traditionally would coach it with someone that has excessive anterior pelvic tilt.
We do not want to have them actively work into a "pelvic tilt" or posterior pelvic tilt initially as they lack the ability to do that without relying on old habits of excessviely compressing the low posterior pelvis and shoving their hips underneath them.
I would want to put them actually in a slight amount of extension and help them get there without overdoing it and/or kicking on the low back muscles, glutes, or hamstrings. Here are a few example exercises:
This is a modified Postural Restoration Institute exercise. www.posturalrestoration.com
Technique used with permission. Copyright © Postural Restoration Institute®2022. www.posturalrestoration.com
This is a modified Postural Restoration Institute exercise. www.posturalrestoration.com
Bonus: Lateral Compression with External Load
If you are able to do this, I highly recommend it. You can get some pretty awesome results doing this, and it doens't even require any effort! Using external weight to "compress" the pelvis from side-to-side can massively help those with opening up their back-side pelvis. If you don't have a sandbag, don't worry! They are very inexpensive at your local hardware store (i.e. Home Depot), or... you can simply have someone sit on your hip (seriously), as long as they are sitting in the right place as described in the video. I recommend 3-5 minutes per side. Just remember that this in isolation won't be enough, as you are simply just opening up space without educating your body what to do with it. Be sure to do other drills with more muscular-driven strategies as well!
Learn how to shut off their six-pack abs and use their obliques to control pelvic tilt
Remember that the six-pack is tight, but that doesn't mean it's strong. We often need more input from the obliques (side abs) and transverse abs (deep abs) to control the tilt of the pelvis, as they have significantly more leverage to control genuine forward (anterior) and backward (posterior) rotation of the pelvis due to significantly more broad attachment sites on both the ribcage and pelvis:

Image credit: Brookbush Institute
Here are a few easy, ground-based drills to help do that:
Summary
Swayback posture is indicative of several layers of compensation, but is it extremely important to keep in mind that is isn't "bad" to have this posture.
We know pretty concretely that posture is not directly correlated with pain, but we do know that is can be correlated with certain movement limitations that can be associated with issues.
If you want to address this issue, it's important to address the root cause: A center of gravity that is unstable. We want to provide stability to the skeleton by opening up joint positions and then educating the system on how to use feel safe in those new positions. I recommend you try the above drills and re-test your measurements and see what improves. A good start would be 3 sets of 5 breath cycles per drill (the ones that actually make a change for you) per day for the first couple of weeks.
Don’t miss out on free education
Join our email list to receive exclusive content on how to feel & move better.


